A0

Labels

Peer to peer Network with different sharing's


 Building and testing a Peer-to-Peer network

Tasks:


1.    Introduction (IP Assigning)

2.    Data Sharing

3.    Internet Sharing

4.    Resource Sharing


Introduction (IP Assigning):


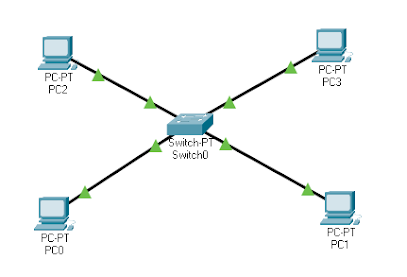
Peer to peer connection is the directly connection between two or more pc’s. Here there is no server because every pc is itself acting like a server. Now I will create an example of peer to peer network and tell you how to assign IP to them.


Peer to peer connection


So this is peer to peer network and now to assign IP to them we will click on any computer to assign it an IP after clicking on it click the Desktop button from Manu after this click on IP configuration and now you can assign any IP in IPv4  section and after assigning the IP hit the Enter.  In the same way you can assign IP to every computer.


Data Sharing:

You need to do some steps to share the data

1)      Connect two or more pc’s with the Ethernet cable

2)      Assign the IP addresses to them

3)      Disable the Window firewall

4)      Enable network sharing

5)      Verify the connectivity by ping command

6)      Now you can share the data


Internet Sharing:

To share the internet you should follow these steps

1)      Connect the client with host using Ethernet cable

2)      Go to the view network connections

3)      Now enable the internet sharing and  turn the sharing option to Ethernet

4)      Now close this window and come back to view network connection window

5)      Here you should assign the IP address in Ethernet option

6)      Now go to client computer and go to the same view inter sharing

7)      Here find the Ethernet option and assign here the same IP address as given to the host.

8)      Now you can surf internet.


Resource Sharing:

To share resources between peer to peer connection we need to follow the following steps

1)      Connect the pc’s with Ethernet cable

2)      Turn off the firewall

3)      Configure IP address

4)      Now make the Home group

5)      Now change the setting by go to the properties of your drive and change the sharing setting

6)      Now you can share the resources

Switch Based Network and Connection testing, Internet sharing, RDC


Q1: Building and testing a Switch based Network.


1.     Introduction (devices Connectivity, IP Assigning)

2.     Connection Testing

3.     Internet Sharing

4.     Remote Desktop Connections

5.     Use Hub, switch, Routers to connect network.


Introduction:

                          Switch is a network device and uses to connect different types of devices such as computers, servers, printers etc. So basically this little bit different than hub because it do not broadcast the data like a hub therefore this device is more secure and more intelligent device than hub but more expensive. Switch can store MAC and IP addresses and by using them it will send the message directly to the specific device.


IP Assigning:

                         To assign IP address to switch we should need to go the CLI setting inside the switch we can enter by clicking on the switch and after this you can see the CLI option above in Manu. After clicking on the CLI we need to enter the commands to assign the ip address to the switch. So, the commands are the following

1)      First of all enter the ”enable”

2)      After this to check your VLAN IP address enter the “show ip interface brief”

3)      If there will be no IP assign to VLAN then enter “configure terminal”

4)      Now enter “interface VLAN 1”

5)      Now enter any IP address with subnet like this” ip address 192.168.1.9 255.255.255.0”

6)      After this enter ”no shutdown”

7)      Now you added the IP address successfully so therefore to check it firstly press ctrl +z

8)      After this enter again “show IP interface brief”


set ip address of switch on cisco


            Output will be like this as you can see you had successfully assigned the IP address to the switch.


Connection Testing:

                                          We can test the connection by send the ping to other network if the network ping back the message then networking is working properly otherwise there is a problem inside the network.


Internet Sharing:

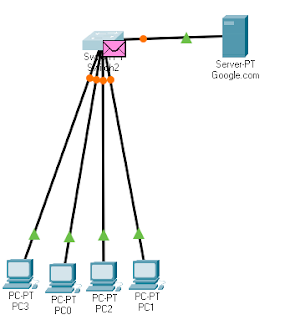
                                To share the internet there are need of some network devices, switch to join the network, internet service provider and servers. Firstly the request from a network will go to switch and then by passing through switch it go to the internet service provider and after ISP request will go to the server and then server will respond back to the network. In this way surfing on internet works.

Remote Desktop Connections:

                                     Remote desktop connections allow us to use the other’s pc by using software made by Microsoft. The main purpose for remote desktop connection is to solve software related problems from home using an internet connection. Now some hackers also use this software to hack the other’s pc.


Use Hub, switch, Routers to connect network:

Using Switch:


switch connection


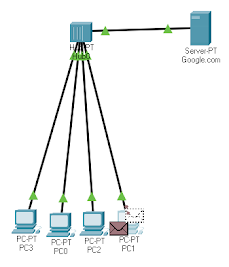
Using Hub:

connection using Hub

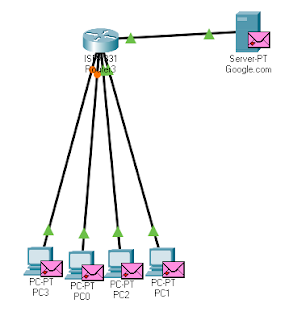
Using Router:


Connection using Router


IP Addressing with class and ranges and types


Q1: Introduction to IP Addressing (IPV4)


Q2: IP Classes and their Ranges with example


Q3: Public and Private IP address with example


Networking


IP Addressing:

                                IPv4 address is the 1st type of IP address which is an unique address generated by the router to identify the network. It is 32 bit long address with four 8 bit fields. Bad thing about this ipv4 is this that it can only generate about 4 billion unique addresses which would be less in future so, therefore to fulfill this requirement ipv6 were introduced which is 64 bit long address. Also IP address has two parts one is network and other is host.


IP Classes and their Ranges:

Class

1st Octave

Network Host

Subnet

Hosts per Network

A

1-----------126

N.H.H.H

255.0.0.0

2^24------2^32

B

128--------191

N.N.H.H

255.255.0.0

2^16------2^23

C

192--------233

N.H.H.H

255.255.255.0

2^0-------2^15

D

224--------239

   RESERVED   

        FOR

MULTICASTING

E

240--------254

EXPERIMENTAL

    USED FOR

RESEARCH


For example IP address for class A is 1.1.1.1 as the same way IP address for class C is 198.168.1.1. In this way this IP addresses uses but class D and E are only reserved for the Research and multicasting.

Public and private IP addresses:

                                                                IP address is the globally unique IP address provided by ISP to our network also there is a private IP address which is locally unique IP address furthermore we cannot access the internet by using private IP address also there are some ranges from class A, B and C which is only reserved for private IP addresses and the range is here

Class

Private IP address

A

10.0.0.0------------------10.255.255.255

B

172.16.0.0---------------172.31.255.255

C

192.168.0.0--------------192.168.255.255

Now the whole story is here that our pc contains private IP addresses and our internet service provider contains public IP addresses so if we want to access the goggle then request from our local network send to ISP and then ISP provides us a public IP address to access the Google so in this way we access the internet.

All Types of Cables with types


Q1: Basic cable construction and testing


1.    Straight

2.    cross-over

3.    Roll-over)


Cables


(These cables are connect through RJ-45)

Straight through cable:


                                         Straight through cable is the type of cat 5 use to connect two different kind of networking devices such as computer with router or computer with hub etc. In this cable both the ends are the same colors. Color code for straight through cable is given below


End 1

End 2

Orange

Orange

Orange and white

Orange and white

Green and white

Green and white

Blue and white

Blue and white

Blue

Blue

Green

Green

Brown

Brown


Brown and white


Brown and white


Cross over Cable:

                                 Cross over cable is the type of cat 5 cable use to connect the same kind of devices such as one pc with other, one switch with other etc. Here in cross through cable both the ends contain different kind of colors. So the color codes are given below

End 1

End 2

Orange and white

Green and white

Orange

Green

Green and white

Orange and white

Blue

Blue

Blue and white

Blue and white

Green

Orange

Brown and white

Brown and white


Brown

Brown


Roll Over Cable:

                                  Roll over cable is the type of cable use to connect computer terminal with router console port. It is also called console cable also It has light blue color. Color codes for roll over cable are following

End 1

End 2

Orange and White

Brown

Orange

Brown and White

Green and White

Green

Blue

Blue and White

Blue and White

Blue

Green

Green and White

Brown and White

Orange

Brown

Orange and White